
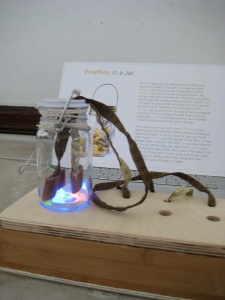
Fireflies in a Jar is a teaching tool for children who can’t sleep in the dark. There’
s going to be three differently programmed fireflies and a jar where the child can place them in. Before going to bed, the child can place as many fireflies into the jar and close the lid to activate the light. You can adjust the luminosity of the jar by putting more or less fireflies in. The light from each firefly will eventually turn off within a certain time span. The child at this point will either be too tired to put in more fireflies, and end up sleeping in the dark, or still be awake. Then they have the option of putting more fireflies in to reactive the light or sleeping in the dark.
The program of the different combination of fireflies. The different combinations of fireflies will have different programs that will mimic the light of a firefly. The LED will blink or glow at different speeds with different delay times. Each light will also be programmed to have different time span for it to be on, keeping the fireflies spontaneous and fun for the child.
How will it work? Each firefly will have an LED attached to it. The fireflies will sit on its own on/off switch. Removing the firefly from the switch will let us know which firefly is being put into the jar and need to be on once the jar is closed. The jar will also have a mercury tilt sensor, attached to the lid, that will tell us when the jar is closed. Once a firefly is placed into the jar, and the jar is closed, the program for that firefly will run as long as the jar is closed. If the jar opens and closes, with the same firefly in the jar, the program of that firefly will restart. This works with all the fireflies.
Parts List: Arduino, circuit wire, conductive thread, tape, 3 LEDs, mercury tilt sensor, ribbon, wooden box, jar
Video Demonstration:
Circuit diagram:

Wiring:


code:
int tiltSensor = 3;    // connect tiltSensor to pin 3
int ffHome1 = 9;       // connect home1 to pin 9
int ffHome2 = 10;      // connect home2 to pin 10
int ffHome3 = 11;      // connect home3 to pin 11
int ffLite1 = 5;       // connect ff1 to pin 5
int ffLite2 = 6;       // connect ff2 to pin 6
int ffLite3 = 7;       // connect ff3 to pin 7
int count1 = 5;        // set glow to 5 times
int count2 = 3;        // set glow to 3 times
int count3 = 7;        // set glow to 7 times
int count4 = 4;        // set glow to 4 times
int count5 = 2;        // set glow to 2 times
int count6 = 5;        // set glow to 5 times
int count7 = 10;       // set glow to 10 times
int brightness = 0;    //

void setup ()
{
  pinMode (tiltSensor, INPUT);  // set switch 0 as digital input
  pinMode (ffHome1, INPUT);     // set switch 1 as digital input
  pinMode (ffHome2, INPUT);     // set switch 2 as digital input
  pinMode (ffHome3, INPUT);     // set switch 3 as digital input
  pinMode (ffLite1, OUTPUT);    // set led 1 as analog output
  pinMode (ffLite2, OUTPUT);    // set led 2 as analog output
  pinMode (ffLite3, OUTPUT);    // set led 3 as analog output
  Serial.begin(9600);           //
}

void ffOFF(int ff)         // when "ffOFF" is stated
 {                         //
 digitalWrite(ff, HIGH);   // ff don't glow
 }                         //

void glow(int ff, int slowness)           // when "glow" is stated
{                                         //
  for (brightness = 0; brightness < 255; brightness ++)
         { analogWrite (ff, brightness);  // make ff glow
           delay (slowness);              // delay
         }                                //
  for (brightness = 255; brightness > 0; brightness --)
         { analogWrite (ff, brightness);  // then make ff dim
          delay (slowness);               // delay
         }
 }

void glow2(int ff1, int ff2, int slowness) // when "glow2" is stated
{                                          //
  for (brightness = 0; brightness < 255; brightness ++)
         { analogWrite (ff1, brightness);  // make ff1 glow
           analogWrite (ff2, brightness);  // make ff2 glow
           delay (slowness);               // delay
         }                                 //
  for (brightness = 255; brightness > 0; brightness --)
         { analogWrite (ff1, brightness);  // then make ff1 dim
           analogWrite (ff2, brightness);  // then make ff2 dim
          delay (slowness);                // delay
         }
 }

void glow3(int ff1, int ff2, int ff3, int slowness)  // when "glow3" is stated
{                                                    //
  for (brightness = 0; brightness < 255; brightness ++)
         { analogWrite (ff1, brightness);  // make ff1 glow
           analogWrite (ff2, brightness);  // make ff2 glow
           analogWrite (ff3, brightness);  // make ff3 glow
           delay (slowness);               // delay
         }                                 //
  for (brightness = 255; brightness > 0; brightness --)
         { analogWrite (ff1, brightness);  // then make ff1 dim
           analogWrite (ff2, brightness);  // then make ff2 dim
           analogWrite (ff3, brightness);  // then make ff3 dim
          delay (slowness);                // delay
         }
 }

void loop ()
{
  Serial.println(digitalRead (tiltSensor));
 if (digitalRead (tiltSensor) == HIGH) {  // when jar is closed
  Serial.println ("the jar is closed, fireflies awake");

    if(digitalRead (ffHome1) == LOW)      // and when ff1 is not home
    {if (count1 > 0) {                    //
       glow (ffLite1, 5);                 // glow ff1
       count1 = count1 - 1;}}             // 5 times.
    else                                  //
      {ffOFF(ffLite1);                    // when ff1 is home, don't glow
       count1 = 5; }                      // set glow back to 5 times.

    if(digitalRead (ffHome2) == LOW)      // and when ff2 is not home
    {if (count1 > 0){                     //
       glow (ffLite2, 5);                 // glow ff2
       count2 = count2 - 1;}}             // 3 times.
     else                                 //
       {ffOFF(ffLite2);                   // when ff2 is home, don't glow
       count2 = 3;}                       // set glow back to 3 times.

    if(digitalRead (ffHome3) == LOW)      // and when ff3 is not home
    {if (count1 > 0){                     //
       glow (ffLite3, 5);                 // glow ff3
       count3 = count3 - 1;}}             // 7 times.
     else                                 //
       {ffOFF(ffLite3);                   // when ff3 is home, don't glow
       count3 = 7;}                       // set glow back to 7 times.

    if(digitalRead (ffHome1) == LOW && digitalRead (ffHome2) == LOW )  // and when ff1 and ff2 is not home
    {if (count1 > 0){                     //
       glow2 (ffLite1, ffLite2, 5);       // glow ff1 and ff2
       count4 = count4 - 1;}}             // 4 times.
     else                                 //
      {ffOFF(ffLite1);                    // when ff1 is home, don't glow
       ffOFF(ffLite2);                    // when ff1 is home, don't glow
       count4 = 4;}                       // set glow back to 4 times.

    if(digitalRead (ffHome1) == LOW && digitalRead (ffHome3) == LOW )  // and when ff1 and ff3 is not home
    {if (count1 > 0){                    //
       glow2 (ffLite1, ffLite3, 5);      // glow ff1 and ff3
       count5 = count5 - 1;}}            // 2 times.
    else                                 //
      {ffOFF(ffLite1);                   // when ff1 is home, don't glow
       ffOFF(ffLite3);                   // when ff3 is home, don't glow
       count5 = 2;}                      // set glow back to 4 times.

    if(digitalRead (ffHome2) == LOW && digitalRead (ffHome3) == LOW )  // and when ff2 and ff3 is not home
    {if (count1 > 0){                    //
      glow2 (ffLite2, ffLite3, 5);       // glow ff2 and ff3
      count6 = count6 - 1;}}             // 5 times.
    else                                 //
      {ffOFF(ffLite2);                   // when ff2 is home, don't glow
       ffOFF(ffLite3);                   // when ff3 is home, don't glow
       count6 = 5;}                      // set glow back to 5 times.

    if(digitalRead (ffHome1) == LOW && digitalRead (ffHome2) == LOW && digitalRead (ffHome3) == LOW )  // and when ff1, ff2, and ff3 is not home
    {if (count1 > 0){                        //
      glow3 (ffLite1, ffLite2, ffLite3, 5);  // glow ff1, ff2, and ff3
      count7 = count7 - 1;}}                // 10 times.
    else                                     //
      {ffOFF(ffLite1);                       // when ff1 is home, don't glow
       ffOFF(ffLite2);                       // when ff2 is home, don't glow
       ffOFF(ffLite3);                       // when ff3 is home, don't glow
       count7 = 10;}                         // set glow back to 10 times.
 }
 if (digitalRead (tiltSensor) == LOW)        // when jar is opened
 {ffOFF(ffLite1);                            // ff1 don't glow
  ffOFF(ffLite2);                            // ff2 don't glow
  ffOFF(ffLite3);                            // ff3 don't glow
  Serial.println("the jar is OPEN; fireflies asleep");}
}


You must be logged in to post a comment.